Movie Battles II requires a copy of Star Wars Jedi Knight: Jedi Academy to run properly. If you do not own Jedi Academy, you can buy it on Steam (includes both Windows and Mac), GOG (Windows only) or the Mac App Store (Mac only). The game can also be obtained through the Origin or Discord stores, though the launcher does not natively support those (must use workarounds to start the game).
These instructions require a valid physical CD/DVD copy of Jedi Academy. Movie Battles II requires the 1.01 patch.
CD/DVD: Launcher Installation[]
If you're reading this, that means you've already downloaded the MBII Launcher. If you haven't downloaded the launcher you can download it from here: MBII Launcher
Navigate to your game's installation directory. This will be different depending on your operating system's architecture.
On 64-bit Operating Systems: C:\Program Files (x86)\LucasArts\Star Wars Jedi Academy\GameData
Important: If you installed Jedi Academy in a different directory you will need to navigate to where you installed it to and find the GameData folder to continue.
Select and move MBII Launcher to your GameData folder. It is required that the launcher be in your GameData folder for the game to run. Once you start the launcher press the Install button on the launcher and it will begin downloading automatically. If you installed Jedi Academy on a different drive than your operating system, you may need to make sure that it is the recognized path in the settings.
Let the game download, and once finished press the Play button on the launcher.
CD/DVD: Manual Archive Installation[]
If you're reading this, that means you've already downloaded Movie Battles II. If you haven't downloaded the Movie Battles II archive, download the latest complete / full version here.
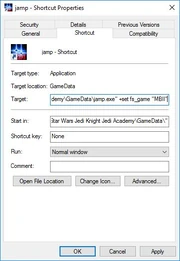
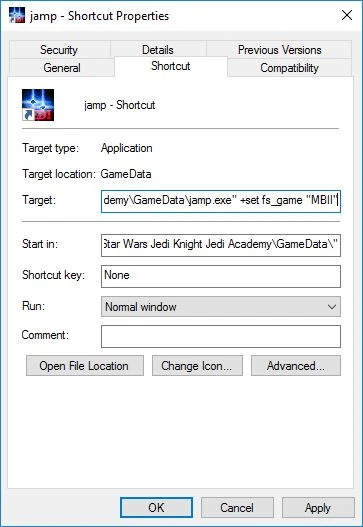
Adding launcher parameters to jamp.exe desktop shortcut.
Navigate to your game's installation directory. This will be different depending on your operating system's architecture:
On 64-bit Operating Systems: C:\Program Files (x86)\LucasArts\Star Wars Jedi Academy\GameData
Important: If you installed Jedi Academy in a different directory you will need to navigate to where you installed it to and find the GameData folder to continue.
Select all of the files in the containing Movie Battles II archive (.zip) file, and drag them into your GameData folder, pressing OK whenever prompted. You may also simply drag the entire archive file to the GameData folder and use the extract to function.
There are two noteworthy ways to run Movie Battles II, without the Steam version which will be covered further on in the guide (#MBII With Steam JKA). Running the Play_MBII.bat file included is the easiest way. You can also create a desktop shortcut of jamp.exe and add +set fs_game "MBII" into the target field at the end of the directory in the properties of the shortcut.
MBII With Steam JKA[]
These instructions require the Steam version of Jedi Academy.
Steam: Launcher Installation[]
If you're reading this, that means you've already downloaded the MBII Launcher. If you haven't downloaded the launcher you can download it from here: MBII Launcher
Navigate to your game's installation directory. This will be different depending on your operating system's architecture:
On 32-bit Operating Systems: C:\Program Files\Steam\steamapps\common\Jedi Academy\GameData
On 64-bit Operating Systems: C:\Program Files (x86)\Steam\steamapps\common\Jedi Academy\GameData
Important: If you installed Jedi Academy in a different directory you will need to navigate to where you installed it to and find the GameData folder to continue.
Select and move MBII Launcher to your GameData folder. It is required that the launcher be in your GameData folder for the game to run.
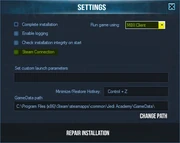
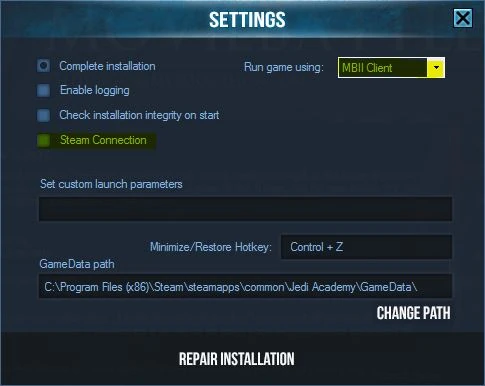
Once you start the launcher press the Install button on the launcher and it will begin downloading automatically. If you installed Jedi Academy on a different drive than your operating system, you may need to make sure that it is the recognized path in the settings.
Once the game is finished downloading and you have changed the above settings press the "Play" button on the launcher. If you run into an issue running MBII through the launcher, it is most likely because you didn't install Jedi Academy in the default directory. If this is the case, you will need to go into the settings of the launcher, and change the option Run game using: to MBII Client instead of JAMP, or run the game directly through Steam using launch parameters as described in the Archive Installation, if you want to have the Steam overlay.
Steam: Manual Archive Installation[]
If you're reading this, that means you've already downloaded Movie Battles II. If you haven't downloaded the Movie Battles II archive, download the latest complete / full version here.
Navigate to your game's installation directory. This will be different depending on your operating system's architecture:
On 32-bit Operating Systems: C:\Program Files\Steam\steamapps\common\Jedi Academy\GameData
On 64-bit Operating Systems: C:\Program Files (x86)\Steam\steamapps\common\Jedi Academy\GameData
Important: If you installed Jedi Academy in a different directory you will need to navigate to where you installed it to and find the
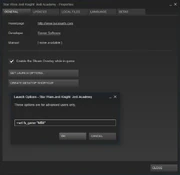
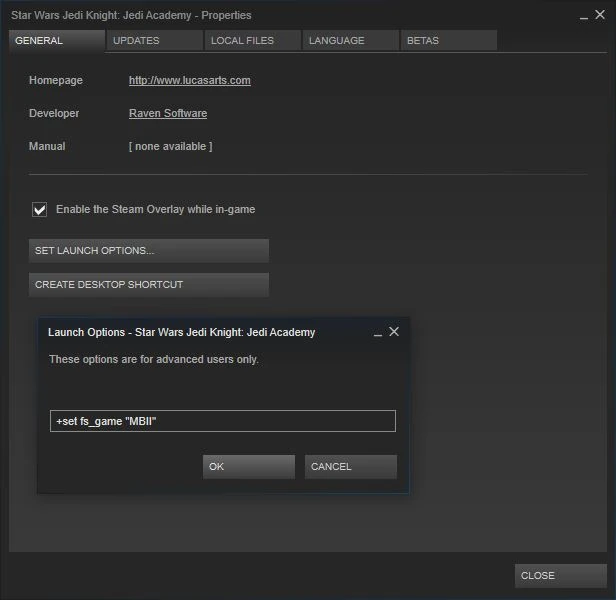
Setting launch parameters in Steam.
GameData folder to continue.
Select all of the files in the containing Movie Battles II archive (.zip) file, and drag them into your GameData folder, pressing OK whenever prompted. You may also simply drag the entire archive file to the GameData folder and use the extract to function.
To play Movie Battles II, you will need to set specific launch options. Right click on Jedi Academy in your Steam Library and select Properties. You should see a button labeled Set Launch Options. Select that, and in the text field copy and paste +set fs_game "MBII". Whenever you start Jedi Academy Multiplayer through Steam it will automatically load to Movie Battles II. If you want to run base, or another modification, you will need to remove or modify the launch options.
Macintosh Installation[]
Requires a physical copy of the Macintosh version of Jedi Academy, or can be purchased through the Mac store, as well as the Steam store.
Navigate to your home library folder, by using the "Go" menu of the Finder while pressing the "alt" key.
Go to "Application Support".
Then depending on the version of jka you use open the folder:
"Jedi Academy" for Steam Version
"Jedi Academy MP" for CD Version
"OpenJK" for OpenJK version
Select the folder MBII contained in Movie Battles II .zip file, and drag it in to the folder previously identified (at point 3). There must be ONLY an MBII folder with all the files. If you have a zip containing a patch don't replace the entire folder, but replace the content inside that MBII folder.
There are several ways to run MBII on a Mac:
On earlier patches (1.01c/d), you can hold shift while running Jedi Academy MP and type in +set fs_game MBII
Alternately for the newer patch (1.01e) and steam version, Redsaurus has provided us with an application for Mac that launches straight to MBII, JKJALauncher.app (you can download that here or here). You will need to launch it the first time holding the shift key to configure it by adding +set fs_game MBII in its setup.
Enjoy!
Mac: Launcher/Mono Installation[]
Install Mono for OS X, following instructions here: Install Mono on Mac OS X | Mono
Place the MBIILauncher.exe in one of the following folder depending on the version of Jedi Academy you're running:
Steam: ~/Library/Application Support/Jedi Academy
Retail CD: ~/Library/Application Support/Jedi Academy MP
OpenJK: ~/Library/Application Support/OpenJK
Open Terminal, and enter in the following, again depending on the version of Jedi Academy you're running:
Steam: cd ~/Library/Application\ Support/Jedi\ Academy; mono ./MBIILauncher.exe
Retail CD: cd ~/Library/Application\ Support/Jedi\ Academy\ MP; mono ./MBIILauncher.exe
OpenJK: cd ~/Library/Application\ Support/OpenJK; mono ./MBIILauncher.exe
The very first time you launch MBIILauncher.exe through Mono it could take some time. This is because Mono is building it's font cache. The second, and consequent launches will be quicker.
Linux Installation[]
This guide will cover installation on a handful of Linux distributions with a focus on servers. Servers may use JAMPDed (original dedicated server engine) or MBIIDed (OpenJK based dedicated server engine), though only JAMPDed is officially supported.
If you wish to run a client on Linux, the only option is to use an OpenJK based engine (this is also not supported, but setup notes will be provided for those who wish to try). Using a Windows client via WINE is technically possible, but is not recommended due to anti-cheat not functioning (any servers requiring this will kick you).
Broadly speaking for the difference between the engines, JAMPDed uses less memory but has known vulnerabilities, though the major ones are patched when running the MBII mod. MBIIDed will use more memory but has additional patching and mitigations for server attacks.
System Requirements[]
Due to the variability of Linux distributions we cannot cover all possible cases, so instead this will reference generally known requirements. CentOS 7 (servers only) and Ubuntu 18.04 and 20.04 are known to work. Other similar distributions may also.
All Engines[]
Original Jedi Academy asset PK3s (from a retail / GOG / Steam / etc. game install)
glibc version 2.17 or newer (2.27 required for clients). This can be checked using using ldd --version Note that this is a soft requirement - if you build from source yourself (rather than using the pre-built binaries) you may be able to target older glibc versions.
Setup Libraries[]
This section assumes use of a 64-bit distro. If your distro is 32-bit then ignore the i686/i386 suffixes in the packages below (some are likely to already be installed in that case too).
At this point you should create a 'GameData' installation directory (the name does not matter) which will be referenced in the rest of this guide.
These additional libs are only necessary for the client engine and its renderer. You may already have them if you have the WINE or Proton packages installed.
sudoaptinstalllibgl1:i386libsdl2-2.0-0:i386
OBS (Arch)[]
If your stream is unable to detect openjk sounds while obs-studio is running make sure the 32-bit versions of the following audio drivers are installed.
sudopacman-Slib32-alsa-liblib32-libpulse
Note: You are unable to use fullscreen mode while streaming audio (use borderless windowed via system). Playing normally has no issues.
Install Files[]
Base Game[]
From your install directory create a sub-directory named base and copy assets0.pk3, assets1.pk3, assets2.pk3, and assets3.pk3 into base from your Jedi Academy installation source.
You now have the choice of downloading and installing the latest MBII release manually, or using the command line installer/patcher tool.
Automatic MBII Install[]
Follow Microsoft's instructions for setting up your package manager with their repositories on your distro. Stop at the point where it talks about installing the SDK or runtime.
Run sudo apt update && sudo apt-transport-https && sudo apt update && sudo apt install dotnet-runtime-3.1 to install the required runtime.
Download the command line installer from the download page (under tools) and extract to your install directory.
Run dotnet MBII_CommandLine_Update_XPlatform.dll from within the install directory (or use the path argument to select another location).
Manual MBII Install[]
Download the latest Complete release from the download page.
Extract the files to your install directory. Ensure you do not nest within a sub-directory. The final structure should resemble:
The following commands assume they are being executed from the install directory. Adjust the paths as necessary if not.
For servers, copy the default server config to avoid it being overwritten when updating (server.cfg is an example name):
cpMBII/server_config_default.cfgMBII/server.cfg
This server.cfg will be executed at startup by the dedicated server, enforcing whatever settings are contained within (a separate config is also written while the server is running but generally you will not want to modify that).
JAMPDed[]
Make the program executable: chmod +x linuxjampded
Start the server (creating a shell script is recommended):
By default JAMPDed will use the path ~/.ja/MBII for its running configuration and log files. If you need to run more than one server simultaneously, each one should have a unique net_port to avoid conflicts.
MBIIDed[]
Make the program executable: chmod +x mbiided.i386
Due to OpenJK based engines already being patched for exploits, the default jampgamei386 must be replaced to avoid crashing: mv -f MBII/jampgamei386.nopp.so MBII/jampgamei386.so
Start the server (creating a shell script is recommended):
By default MBIIDed will use the path ~/.local/share/openjk/MBII for its running configuration and log files. If you need to run more than one server simultaneously, each one should have a unique net_port to avoid conflicts.
MBII Client[]
Make the program executable: chmod +x mbii.i386
The default jampgamei386 must be replaced to avoid crashing when loading tutorials or starting a client-hosted server instance: mv -f MBII/jampgamei386.nopp.so MBII/jampgamei386.so
Start the client (with a shell script or custom shortcut depending on what your desktop environment supports):
./mbii.i386
By default MBII Client will use the path ~/.local/share/openjk/MBII for its configuration and saved files (demos, screenshots, etc).
Note: If you are using Ubuntu 18.04, prefix the above command with DBUS_FATAL_WARNINGS=0 to workaround a bug with that release's SDL2.
Other Useful Information[]
Setting up a Jedi Academy Dedicated Server[]
These guide is for setting up a home hosted dedicated server, and may not work with servers rented from an official game server provider.
Download the latest full / server version archive file.
Download the JampDed.exe file required to run the server. Download Here
Change information in the server.cfg you intend to use; server name, motd, rcon and smod passwords, map rotation.
Create a blank notepad file and copy the following:
Save the file as MBIIServer.bat and change the file type to All Files, and place the file you created in your GameData folder.
Forward the port 29070 in either your modem/router or your firewall. The way you go about this depends on your modem/router, or if you use a third party firewall.
Create a desktop shortcut (recommended) of the batch file that you made to run your server with, and run it.
First Time Launching[]
As with any game, it is important that you run through the settings and controls before you join a game.
Widescreen Support
Widescreen Options
Network Settings
Weapon Bindings
Movie Battles II Specific Bindings
Force Power Controls
Changing Name
Jedi Academy, like most Quake games, supports standard colors in text. They are as followed: ^1 = Red ^2 = Green ^3 = Yellow ^4 = Blue ^5 = Cyan/Light-blue ^6 = Purple ^7 = White ^0 = Black
Troubleshooting Information[]
Unexplained Mac client crashing[]
Solution: Disable EAX in your sound options, it may solve any unexplained crashing problems.
VM_Create on UI failed Error / Unexplained Crash to desktop on startup[]
Models holding their arms out / T-Posing / Sliding[]
This animation error happens if you are loading MBII through the base game's mod menu. This is not supported.
Solution #1: Carefully review the installation instructions and use a supported launch method.
Solution #2: Copy the file z_MB_BaseAssets.pk3 from your MBII folder into the base folder. Be aware that while this will fix animations in MBII, it will cause the same issue to appear when playing base or other mods.
Application load error 5:0000065434[]
This happens if you are using the Steam version of Jedi Academy and it is not installed to the same drive as the Steam client.
Solution #1: You will need to change the way the MBII Launcher runs the game. Go to the launcher settings and where it says Run game using: change that to MBII Client, and untick Steam Integration.
Solution #2: Change the Steam install location of Jedi Academy to the same as the Steam client (not a custom library). This can be done by going to Jedi Academy's Steam properties > Local Files tab > Move Install Folder and selecting the default library where Steam was installed (typically C:\ but this may vary depending on your Steam install).
Solution #3: Run the game through Steam by setting the Launch Parameters there (add: +set fs_game "MBII"). You will still need to keep the launcher running in the background to avoid getting kicked on most servers.
recursive error after: ^1default menu file not found: ui/mb_menus.txt, unable to continue![]
Solution: This indicates an issue with your assets. If using the launcher, run a repair from the settings menu. If manually installed, redownload and/or re-extract the latest version to GameData and ensure everything is overwritten properly.
d-bus not built within -r dynamic so unable to print a backtrace[]
Solution: Issue is due to a bug with the 32-bit SDL2 library on Ubuntu 18.04. Workaround it by starting the client with DBUS warnings disabled (e.g. DBUS_FATAL_WARNINGS=0 ./mbii.i386). The bug was reported here and fixed in later releases.
Launcher cannot download files and .NET Framework 3.5 is not available[]
Solution:Follow these instructions to install .NET 3.5, an older version of .NET which may not be installed by default in Windows 10. If during install you receive an error similar to "0x80070002", you will need to install from the command line instead:
Open an administrative command prompt or powershell window (right click on the start button > Windows PowerShell (Admin).
Copy and paste the command: DISM.EXE /Online /Add-Capability /CapabilityName:NetFx3~~~~
Press Enter and wait for the feature to download and install. You will see a confirmation message when complete if there are no errors.
Nothing happens after clicking Play in the launcher[]
Solution: If you have Steam integration enabled, make sure you are logged into Steam.
No servers or very few are visible after an update[]
Solution: Manually delete any .dll files inside your MBII folder and restart the game.

")
")
")
")
")
")
")