Weapon icons are pictures for weapons shown in-game while cycling through an inventory. Guns, grenades, and other ammo-based weapons need a regular icon and an out-of-ammo icon, while weapons like melee and saber only need a regular icon.
When creating weapon icons, use the Targa (.tga) format instead of PNG (.png). MBII is better optimized for the Targa format. Also, make sure to save all your weapon icons in the /gfx/hud/ folder in your .pk3. This way you'll help establish a standard and make sure everyone can find the icon quickly if need be!
Setup[]
You'll need a picture of your weapon with no background to create the weapon icon(s). The simplest way to create one is to render your weapon in ModView, and remove the background using Photoshop (PS).
- Load up your weapon's .glm in ModView, moving the weapon to your liking, and then copy-pasting (Ctrl+C/Ctrl+V) the render into Photoshop (PS).
- In PS, first remove the background (if you're not sure how, there are plenty of good tutorials online). Resize the icon into a 128x128 canvas, it is recomended to resize the weapon by rules of 25, this should preserve some sharpness. Modview also has weapons a bit bright, so adding some contrast or darkness to how it feels in-game sometimes also is needed. Once the weapon is fitting the frame well, some manual sharpening is advise to help retain texture. Use the sharpen tool.
- Create a new layer with a #2f61ac colored background, behind your weapon. Hide that for now.
- Now position your weapon by moving it to the middle and a few notches to the top (this will make sure the weapon's name text won't be too close to the icon). If need be, also scale the render of your weapon down to make it look somewhat like this:

Creating the 'no ammo' icon[]
This icon will show up in game when this weapon is out of ammo.
- Create a new alpha channel with your weapon fully selected (control clicking on the weapon selects all of it).
- Paint your selected area in the black Alpha 1 channel white. White is the visible area and black is transparent. Now you can save this icon as w_icon_yourweaponsname_na.tga".

Creating the regular icon[]
This icon will show up in game when this weapon has ammo or is a non-ammo based weapon.
- Now we need to add a blue transparency feather behind our weapon. Go back to your RGB channels, hiding the alpha and turn on the blue #2f61ac colored background layer you created prior. Now Go back to your alpha channel, hiding the RGB.
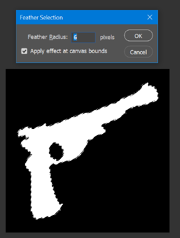
- You should just see your weapon outlined in white. Select it again by control clicking your alpha layer and then right click on your selection -> feather. You will want to be careful your feather doesn't clip out of the frame, so feather wisely. This feather generally depends per weapon. You might need to play with how transparent this is, so first try a 50% opacity outer fill (using brush or paint tool) and adjust accordingly.
- Save this as a targa. Name it "w_icon_yourweaponsname.tga".
